Learn to Embroider on Shoes!
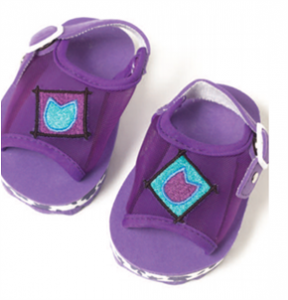
Breathe some life into your shoe collection by adding embroidery! It’s easier than you think to embroidery shoes, whether with hand sewing, textile adhesives or fusibles. Here are three great methods to try.
Sheer Embroidery
For freestanding embroidery, try organdy or organza neatly trimmed just outside the outlining.
- Hoop the sheer fabric without a stabilizer. (If using more than one layer of sheer fabric, prevent puckering by alternating the fabric grain). Make sure to color-match with the top thread.
- After completing the embroidery, trim close to the outer stitching, being careful not to cut the threads. Embellish with beads, if desired.
Trimming Tip: For an even closer trim, use a stencil cutting tool or hot knife to very carefully melt the fibers of the fabric. Make sure not to heat your tools too hot, as too high of a temperature can leave burn marks in your design.
Water-Soluble or Tulle Embroidery
Use this method when you want a “no background” look. Be sure the design has enough stitching to hold itself together once the water-soluble stabilizer is dissolved. Always test stitch if you’re not sure!
- Hoop one or two layers of a light- or medium weight stabilizer.
- Embroider the design and tear away excess stabilizer.
- Dip the design in water to remove any stabilizer from remaining areas and dry thoroughly before applying to the shoe.
Tips for Unstable Designs: If your design doesn’t have sufficient stability on its own, but you want no visible fabric, choose fine netting as the base in combination with water soluble stabilizer. Choose a netting color that matches your shoe surface.
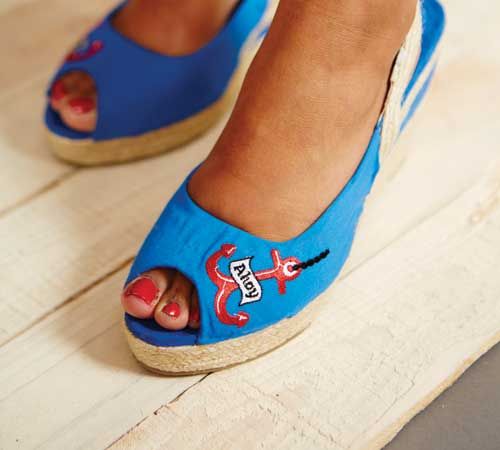
Freestanding Applique

- Hoop water-soluble stabilizer and the applique fabric. Match bobbin and upper thread because the finished edge will be visible.
- After completing initial stitching (enough to hold the fabric in place), remove the hoop from the machine. Do not un-hoop your work yet.
- Cut away the excess fabric close to the stitching and 1/8” outside the stitching, exposing the water-soluble stabilizer. Be careful not to puncture the stabilizer.
- Replace the hoop and continue stitching the motif.
- After completing the embroidery, un-hoop and remove the water-soluble stabilizer, leaving your finished applique!
Looking for more inspiration? Check out Jessie’s article, “Steppin’ Out,” in the May/June issue of CME.
Have you ever embroidered your shoes? Want to give it a shot? Tell us below!


Join the Conversation!